Hi there! Kelly here to tell you more about the PixScan™ mat. Do you know how much this simple mat can do to expand your Silhouette machine’s capabilities? In today’s post I’m sharing how to use the PixScan™ mat to add writing to tags from a scrapbook kit.
PixScan™ Overview: What Can It Do?
The PixScan™ mat comes with its own registration marks, which allows it to use the Silhouette’s optical scanner to find the right place to cut. It has a surprising number of uses to add to the “toolbox” of each Silhouette machine. You will need the correct size of PixScan™ mat for each machine (CAMEO, Portrait, or Curio).
- Cut out images that are already printed, such as commercial cards, invitations, photos, fabric, or pattern paper
- Cut out stamped images
- Cut from scraps of paper with exact placement of cut designs on those scraps
- Digitize your collection of stamps into cut files
- Digitize hand-lettered or hand-drawn items
- Cut to the full edge of 8.5 in. x 11 in. pages without the margin required with Print & Cut
- Cut images you print from other programs on your computer
- Etch random sizes of metal blanks with Curio PixScan™
- Sketch on pre-printed tags and shapes
Seriously, isn’t it amazing everything the PixScan™ mat can do? We can’t cover all of these in a single blog post, so today I’m covering the last point on the list above—sketching on pre-printed tags.
PixScan™ process: how do I use it?
There are basically three steps to the PixScan™ process.
- Import via scanner (or take a picture)
- Assign cut lines (trace, draw, or open shapes)
- Cut
There’s a little more to each step, so read on.
1. Import
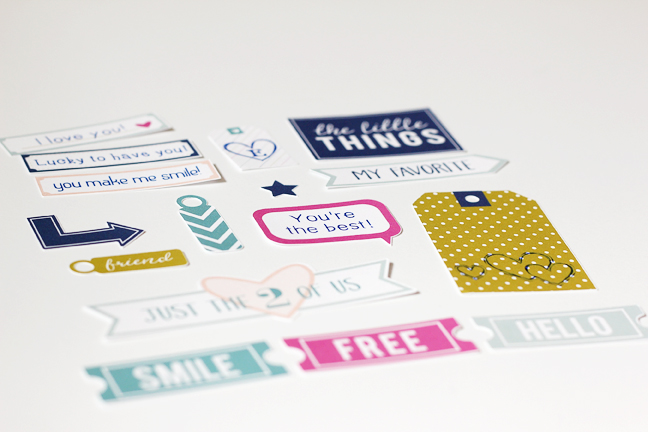
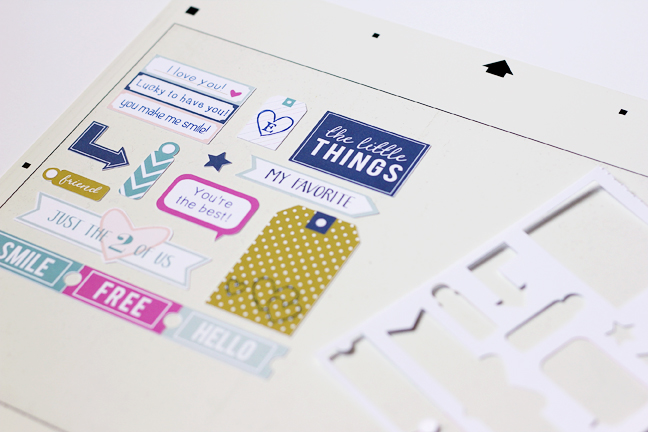
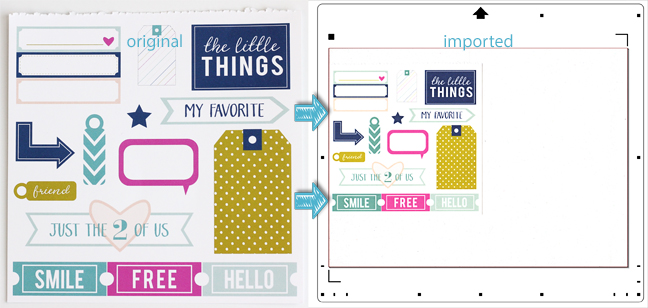
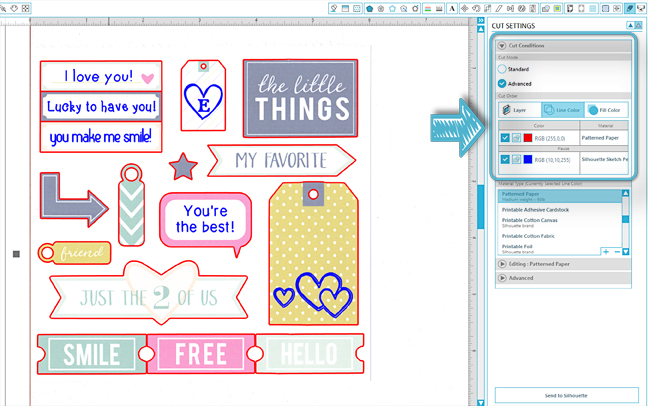
Personally, I like using a scanner better than photographing the mat, but either is an option. Here is a page of uncut decorative tags and shapes from a scrapbook kit by Felicity Jane, and what it looks like once imported into Silhouette Studio®. I could cut these out with scissors, but it’s much more fun to use my CAMEO’s PixScan™ mat to do the work!
- Place the elements page on the PixScan™ mat
- Place it down on a flat-bed scanner
- Click on the PixScan™ icon in Studio
- Import it
You can read tips for the scanning process in this PixScan™ post.
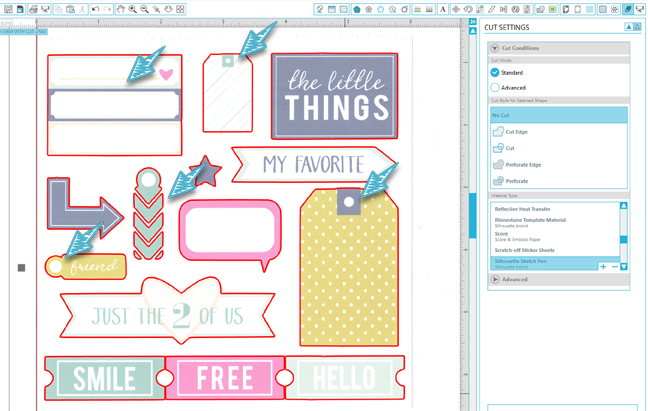
2. Assign cut lines
The next step is to assign cut lines, which is done by:
- Tracing
- Drawing shapes and/or
- Using Library designs
I mostly traced the scanned elements to capture the odd-shaped designs. You can read more about using the Trace tool here.
If you trace the entire set and then want to clean it up a bit, you just need to
- Select the red trace lines
- Right click and choose Release Compound Path (or Object>Modify>Release Compound Path)
Now you can work with individual lines and shapes to delete any extra artifacts, or Point Edit to tidy up ragged shape outlines.
You can also see after my initial trace I have most of the cut lines, but there are additional areas that need attention. I need a few more lines, circles, and alterations to individual shapes.
3. Add text for sketching
While you’re busy adding cut lines for actually cutting around the shapes on the pre-printed page, you can also add some fun text for sketching. Writing in your own handwriting on existing tags, journaling blocks, and other labels is not your only option when you have a Silhouette machine and a PixScan™ mat in your arsenal!
Use the text tool to type anything you want inside the shapes that will be cut out. In general, you should choose a dedicated sketch font when using sketch pens. There are so many cute sketch fonts in the Silhouette Design Store!
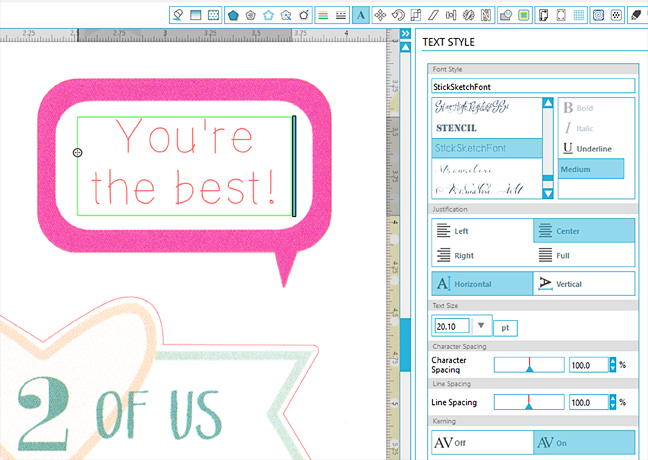
You can see I added some sketch designs to some of the tags in addition to text. (See photo below.)
4. Cut
- Before cutting, remember that you need to designate which lines to cut and which lines to sketch.
- Set your tag and shape lines so they will cut with the blade, and make sure your sketch pen lines will go on a different pass with the sketch pen.
- I set mine up with red lines to cut and blue lines to sketch, with a pause in between so I could swap the blade and sketch pen on my CAMEO 2 between passes.
- You can read more about the Advanced options to Cut by Line Color in this post.
PixScan™ anything!

Who’s ready to try sketching on some premade tags or journaling blocks? What else would you like to try with the PixScan™ mat?
Ray
October 10, 2016
Thanks Kelly, this is a wonderful tutorial!
May I ask that you address the first installment of PixScan mat in one of your future posts? (The first few steps when you print the dotted page to calibrate your scanner/camera with the mat and the software).
I have the PixScan mat for over a year now and wasn’t able to go passed that stage…
Thanks much in advance!
Kelly Wayment
October 18, 2016
I’ll add that to the list of topics to cover, Ray. A scanner does not require calibration, and many camera phones have a preset calibration, so it may already be there for you!
linda ann
October 10, 2016
Why cant the printer ,print registration marks on my paper when I am going directly from my software/,say like useing a exsisting design ,in my library or a new drawn on in silohette?cameo or curio? I want to print/cut/emboss on watercolor paper than mount on a embossed “Frame”
can this be done I am thinking ahead of muself? cause the curio comes with the black squares?peace
Kelly Wayment
October 20, 2016
Linda Ann, you can print & emboss directly from the software with the Curio!
Search “print & emboss” on this blog to find my tutorial for Print & Emboss Thank You Card on November 19, 2015. It includes how to use those black squares.
Anita
October 11, 2016
What size scanner do you have?
Kelly Wayment
October 18, 2016
Anita, I have used both a “normal” size scanner on an all-in-one printer that will scan letter and A4 pages (which requires two passes of the CAMEO PixScan™ mat) and a larger scanner that fits the entire CAMEO PixScan™ mat in one scan. See the link at the bottom of Step 1 (Import) for my tips on scanning.
Martinez
October 14, 2016
I have had my pix scan mat for over a year now too and haven’t used it more than once and had one failed use. I would like more tutorials on the list you provided in the beginning! Digitalize stamps and scrapbook paper would be amazing!
Kelly Wayment
October 18, 2016
I know there are so many things the PixScan™ mat can do that still need to be covered in tutorials! I’ll add them to the list. 🙂
Heather
October 30, 2016
I would very VERY much like to see a tutorial on these two, which is kinda why I got the Pixscan mat in the first place and I’m just having a hard time. From the video on the Silhouette site, it looks easy but they don’t tell you how to digitize and then nest your stamps onto materials! Plus I’m a total newbie to the Studio software.
Digitize your collection of stamps into cut files
Digitize hand-lettered or hand-drawn items
Thank you very very very much!!!
Heather